How Kitchen Appliances are Installed - London
Getting a new kitchen appliance is exciting, but the installation itself is where things can go sideways fast. A loose water connection, a cramped cabinet opening, or a circuit that can't handle the load: these are the kinds of problems that turn a straightforward job into a costly headache. Whether you're fitting a new dishwasher into a kitchen in North London or swapping out an old oven in a South London flat, the process is the same. Preparation is everything.
Quick take: This guide walks you through every stage of a kitchen appliance installation checklist, from pre-installation checks and water supply requirements to drainage, electrical connections, and the mistakes most commonly made. Follow these steps, and your new kitchen appliances will be up and running safely, with no surprises.
Why a Checklist Matters
Think of installing a kitchen appliance like solving a puzzle. Every piece has to be in place before the picture makes sense. Skip a step, and you might not notice the problem straight away, but you'll notice it eventually.
A proper installation checklist gives you a structured way to verify that everything is ready before you start: the space, the utilities, the connections. One oversight, a slow drip at a water joint or an undersized circuit, can lead to water damage, a tripped breaker, or a voided warranty. None of those are cheap to fix.
This is especially true in London homes, where older properties often have outdated plumbing or wiring that wasn't designed for modern kitchen appliances. If you're planning a wider kitchen overhaul, our kitchen fitting service can take care of the full job, appliances included.
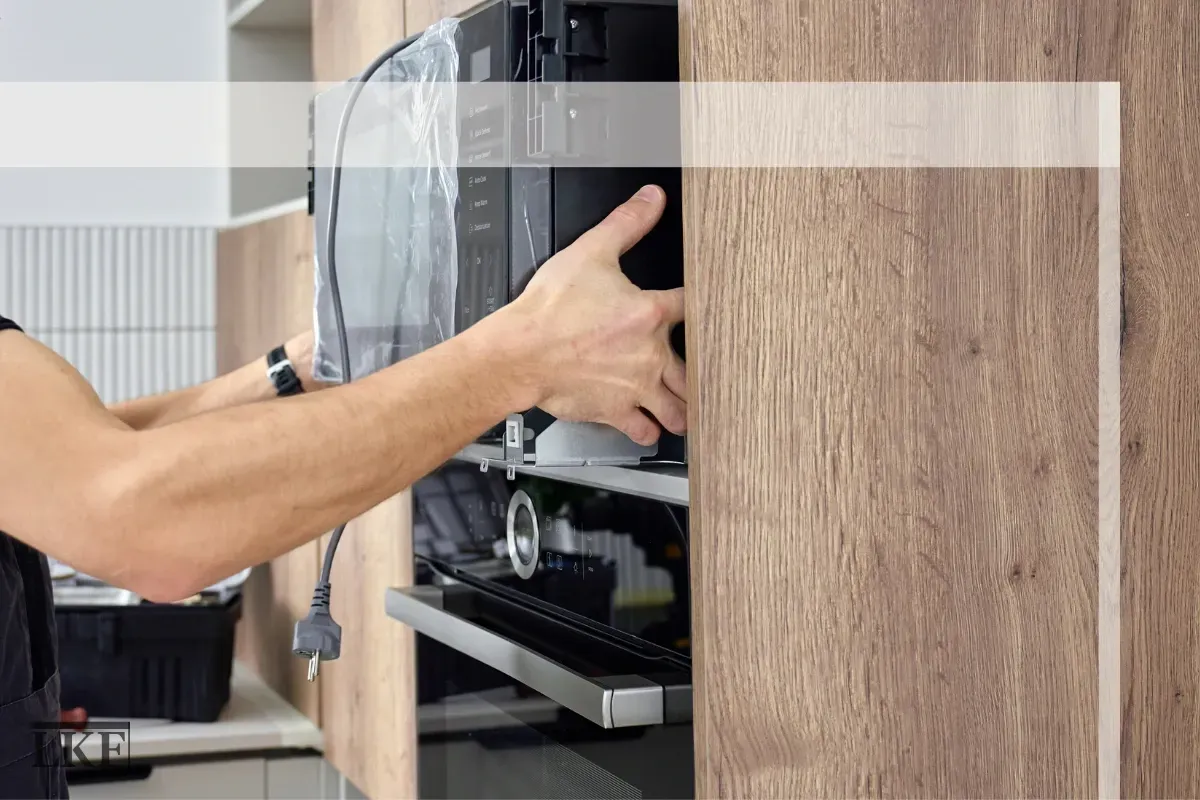
Pre-Installation Checks
Before anything else, get the site ready. These are the checks to run before your new kitchen appliances are even delivered.
Measure the space. Check the height, width, and depth of the intended spot against the appliance's dimensions. Most appliances need clearance for ventilation and door swing. Measure first to avoid discovering on delivery day that it doesn't fit.
Verify the electrical supply. Check that the right outlet or connection point is in place and meets the voltage and amperage your appliance needs. Larger kitchen appliances like electric ovens and induction hobs often require a dedicated circuit. If one isn't already there, you'll need a qualified electrician to install it before the appliance arrives.
Check water and drainage access. For appliances that use water, confirm the supply line is in place with a working shut-off valve, and that there's a suitable drainage point nearby.
Clear the delivery path. Check clearances on every doorway and hallway the appliance will pass through, and protect the floors along the route.
Gather your tools. You'll typically need a screwdriver, adjustable spanner, spirit level, tape measure, and plumber's tape. Read the manufacturer's instructions beforehand so you know if anything specialist is required.
Address any gaps now. It's far easier to adjust cabinetry or bring in an electrician before the appliance arrives than to deal with delays on the day.

Water Supply Requirements
For kitchen appliances that use water, the supply needs to be set up correctly. Get this wrong and you're looking at leaks, poor performance, or both.
Shut-off valve. There must be an isolating valve on the supply line that you can reach easily. In UK homes, this is typically a 15mm lever or screw valve on the branch pipe. Make sure it opens and closes without sticking and shuts off the water fully.
Hose connections. Attach the inlet hose tightly, with the rubber washer in place. Once the valve is open, check for drips at every joint. Even a slow drip will cause damage over time. Make sure the hose isn't kinked behind the appliance, as a sharp bend can restrict flow or cause a burst.
Cold or hot supply? Most modern UK washing machines and dishwashers run off a cold water feed only, heating the water internally. Some older models have dual inlets. Always check the instructions before connecting anything.
Water pressure. UK mains pressure typically runs between 1 and 3 bar, which suits most appliances. If you suspect unusually low or high pressure, it's worth having a plumber check before installation.
Backflow prevention. UK Water Supply Regulations require the installation to protect the potable water supply from contamination. Many modern appliances have built-in check valves, but Aquastop-type hoses offer an extra layer of protection with shut-off valves that activate if a leak is detected.
Old pipework. If you're reusing an existing supply hose, inspect it thoroughly. Cracks near the ends, stiff rubber, or corroded fittings are all reasons to replace it. New hoses are cheap compared to the damage a burst hose can cause.
Drainage Requirements
Once the water supply is sorted, think about where the waste water goes. Poor drainage setup leads to leaks, overflows, and dirty water backing up.
The right drain connection. In UK homes, dishwashers and washing machines drain via a standpipe (a vertical 40mm pipe with a trap at the bottom) or a spigot on the U-bend under the sink. One of these needs to be within reach of the appliance's drain hose. If neither is in place, a plumber needs to install one first.
Standpipe height. If you're using a standpipe, the correct height is at least 18 inches (46cm) above the trap and no more than 42 inches (about 1 metre). Most appliance manuals specify a range, usually 65cm to 100cm. Outside that range, siphoning or pumping problems will follow.
Dishwasher high loop. Route the dishwasher's drain hose up to a high point under the countertop before dropping down to the drain connection. This stops dirty sink water from flowing back into the machine. It's a simple step that's easy to skip and easy to regret.
Secure the hose. Whether the drain hose goes into a standpipe or clips onto a sink spigot, it needs to be firmly fixed. A hose that pops out mid-cycle will dump a full drum of water onto your kitchen floor.
Check for blockages. Before connecting anything, make sure the drain path is clear. A partial blockage might cope with hand-washing but struggle with the fast outflow of a dishwasher pump.
Electrical and Space Checks
Electrical requirements vary widely between kitchen appliances, and getting this wrong can mean anything from a tripped breaker to a genuine safety hazard.
Standard 13A socket. Most kitchen appliances, fridges, washing machines, dishwashers, microwaves, come with a standard UK plug and run off a regular 13A socket. Check the wattage before assuming this is fine. Anything approaching or exceeding 3kW starts to push the limit.
Dedicated circuits. Electric ovens, induction hobs, and built-in cookers almost always need a dedicated circuit, typically 32A or higher. These appliances are hardwired to a cooker control unit rather than plugged in. If the circuit isn't already in place, a Part P registered electrician needs to install it. This is non-negotiable for kitchen fitting work of any kind.
Ventilation clearance. Every appliance needs breathing room. Fridges need a gap behind for the coils to release heat. Built-in ovens require clearance in their cabinet housing so heat can escape. Dryers need space behind for the vent hose to run without being crushed. Blocking these vents causes overheating and, in the case of dryers, a fire risk from lint accumulation.
Levelling. Use a spirit level to check the appliance front-to-back and side-to-side once it's in position. An unlevel washing machine will vibrate badly during spin cycles and can shift position over time. Fridges need to be roughly level so the doors seal properly. Most appliances have adjustable feet, so take the few minutes to get it right.
RCD protection. Sockets near water sources should be RCD-protected. In UK homes, this is usually handled at the consumer unit. If you're having new circuits installed as part of a kitchen refit, whether through us or another kitchen fitter, this should be part of the conversation.
Installation Mistakes to Avoid
Even with thorough preparation, certain mistakes come up again and again. Here's what to watch out for.
Loose or incorrect connections. A water inlet that isn't quite tight, a drain hose that isn't clamped, or a poorly secured electrical terminal can all cause problems that only show up later. After fitting everything, run a full test cycle and inspect every connection point for drips, moisture, or signs of heat.
Ignoring the manufacturer's instructions. Every appliance model is different. Washing machines ship with transit bolts that must be removed before use. Ranges often come with anti-tip brackets that bolt to the floor. Forgetting either causes immediate damage or a safety hazard. Following the manual also protects your warranty.
Poor ventilation clearance. Fitting an appliance into a space that's too tight is one of the most common kitchen fitting mistakes. A fridge with no gap behind it runs hot and wears out faster. A dryer with a crushed vent hose accumulates lint and poses a fire risk. Always match the clearances specified in the manual.
Wrong location. A fridge placed next to a cooker or radiator works much harder to maintain temperature. A washing machine installed without proper drainage is a leak waiting to happen. Think practically about heat sources, moisture levels, floor strength, and noise transfer.
DIY gas work. In the UK, it's illegal for anyone who isn't Gas Safe registered to install a gas appliance. No exceptions. If you're planning a kitchen renovation in East London or West London and gas is involved, a Gas Safe engineer is the only person for that part of the job.
Not testing before calling it done. Run the appliance through a full cycle and watch it. Look for drips, listen for unusual noises, and check for heat at sockets. A problem caught in the first ten minutes is easy to fix.
If you're fitting kitchen appliances as part of a wider project with suppliers like Howdens, Wren, IKEA, or B&Q, the same checklist applies regardless of where the units come from.
Final Thoughts on New Appliance Install Checklist
Installing kitchen appliances properly isn't complicated, but it does require patience and attention. The steps in this guide, checking the space, the water supply, the drainage, the electrics, and the common pitfalls, are what separate a clean, safe installation from one that causes problems down the line.
Don't rush it. If any part of the process is outside your confidence level, bring in a professional. A Gas Safe engineer for gas appliances, a Part P electrician for dedicated circuits, and an experienced kitchen fitter for everything that connects it all.
If you're looking for hands-on help with a kitchen installation anywhere in London, you're welcome to get in touch. We handle everything from the units to the plumbing and electrics, all under one roof.

New Appliance Install Checklist FAQs
How soon should I check for leaks after installation?
Straight away. Run a short cycle as soon as the appliance is connected and watch the connections throughout. For washing machines, check around the inlet hose and at the standpipe. For dishwashers, check under the sink. Even a slow drip needs attention. Check again after the first few uses, as some leaks only appear under a full load.
Do ovens and hobs need a dedicated electrical circuit?
Yes. Built-in electric ovens and induction or electric hobs require a dedicated circuit, typically 32A or 45A in UK homes. They cannot safely share a circuit with other appliances. If the circuit isn't already there, a Part P registered electrician needs to install one before the appliance is fitted.
What happens if a kitchen appliance isn't level?
A washing machine that isn't level will vibrate heavily during spin cycles and wear out its suspension faster. A fridge that's off-level may not seal its door properly. Most appliances have adjustable feet, so use a spirit level to check front-to-back and side-to-side, then adjust until it's solid.
Should I replace the water hoses when fitting a new washing machine?
Yes, where possible. Many new machines include hoses in the box, so use them. If yours didn't, buy good-quality replacements rather than reusing old rubber hoses, which can crack under pressure. At minimum, fit a new rubber washer inside the coupling. A burst hose causes serious water damage, and a new hose costs very little by comparison.
